Wednesday, September 30, 2009

Altered Surfaces looks like fun...

The book "Altered Surfaces" is this week's pick. It is by Chris Cozen and is published by Design Originals (who also published my books).

This book is all about "Using Acrylic Paints with Gels, Mediums, Grounds & Pastes". I already use Gel Medium for a lot of things, as a transfer medium, as an adhesive, etc. My plan for this week is to do at least six 4" x 4" canvases using the techniques in the book, then making them into completed collages. I've got a lot of great "tools" like paints, mediums, molding pastes, etc., but they sit on the shelf because I haven't taken the time to play with them. It's time!

I'll be back in a couple of days to show you what I've done. Hope you are finding time in your life for some art-play, journaling, or some other soul-satisfying pastime.

Saturday, September 26, 2009

Wow, that was fun!

I had a lot of fun with these projects - making backgrounds is something I really enjoy doing, it's so random and very relaxing to work on. It is so handy to have a stash of backgrounds on various media to work with!

Here are the results of this week's book selection, "Canvas Remix" by Alisa Burke...

First, I painted a bunch of Claudine Hellmuth's sticky backed canvas using paints from her paint line, then adding graffiti like writing, scribbling, bubble wrap print, etc. to create texture and interest. I then tore the canvas into strips and started covering a wood frame (see the kids picture). I quickly realized that there were going to be a lot of little pieces leftover so I started to cover a canvas board also. My plan was to put a photo in the frame and to collage on the canvas board.

I treated the canvas board as a background and attached the photo using gel medium. The piece of bubble wrap I had stamped with was on the table, covered in paint. I cut off a section and placed it near the photo - it was just what I needed! So, I adhered three strips of painted bubble wrap around the photo (see close up photo). I love the way it looks!
The large photo is of Steve and I at Brian's wedding in Colorado - in a huge field of dandelions in full bloom. It was beautiful! I made dandelion crowns for Britney and Emily, they looked so sweet.

The small photo is of me and my siblings, me, Stuart, Leslie & Valerie. It's one of my favorite photos and a reminder of a joy filled childhood.

So, that's it for this week! I had a lot of fun with this and will be painting more canvas to tear and collage. The book has a lot of great ideas for what to do with your painted canvas, ideas I'll be sure to re-visit down the road. Check back next week to see what I'm up to!

Friday, September 25, 2009

Time and space...

Once again, the week got away from me - how can it be Friday already? Lots going on - we got the POD emptied and the garage partially straightened out on Sunday - the POD was picked up on Tuesday and it's nice to have it out of our front yard! I'm still trying to figure out how I want to set up my metal/soldering/stained glass work area in there. My studio is a big room but it is carpeted and quite full of all kinds of flammable supplies so I'm nervous about soldering in here. So, I'm taking over some of the garage space :)

I had a great time on Monday night, friends Ted and Jaime (owners of The Crafter's Workshop) came over for dinner & art play. We played with their templates and spray dyes/inks on giant sheets of watercolor paper. Well, actually, Ted and I painted and Jaime was our "sous artiste", washing stencils & keeping us organized. We made about eight great sheets of paper and it took three days for all of the ink to come off my hands (I can't work in gloves!).

On Wednesday I made a little quilt for a challenge from ArtQuilt magazine (Stampington & Co.) based on "what's in your car". It took me a while to figure out what to do but I like what I came up with. I may make a couple more over the weekend since I've got a couple more ideas cooking.
Then, Poof!, it became FRIDAY!

The book I've chosen for this week is Canvas Remix by Alisa Burke (North Light Books). The book covers techniques using canvas, paints and stamps to create interesting accessories like tote bags and pins. The work has a grafitti kind of feel to it.

At the beginning of the year I bought Claudine Hellmuth's incredible Studio line of paints but haven't had time to work with them. I thought this would be a good opportunity to combine my weekly book project and using the paints. One of the great things about Claudine's paints is the color mixing chart that can be downloaded from her site. From the fifteen colors in the collection, Claudine gives the combinations that give another fifty-one colors. The paints are creamy and the coverage is great.

I've painted several sticky-back canvas sheets (also a Claudine Hellmuth product) using all fifty-one colors and I'm waiting for them to dry before doing further surface effects (like stamping & mark making). I'll embellish the sheets tomorrow and will figure out what to make from them.

It's going to be a busy weekend, I've got a lot of things to get done in my studio - this comes first though! Come back tomorrow to see what I've come up with!

Sunday, September 20, 2009

Charm photos


I'm so proud of me, I succesfully installed the software for my new camera and figured out how to get the pictures from the camera to the computer! I know this doesn't sound like much but for me, it's an accomplishment!

Here are the photos of the five charms I made for last week's "Bookworm 52" project. I made two pearl bird nest charms and three button stacks. All were pretty easy to make and are really fun necklaces.


It has been a long time since I've made anything along these lines. They were quick to make and I love the results - another fun project I've made because I'm focusing on a book a week. I haven't picked out my book for this week yet - I'll do that tomorrow night. Hope you like what I did this time!


Friday, September 18, 2009

Simply Charming...

With little time to work this week, I chose my book partly because I could accomplish a project in little time. As it turned out, I was having so much fun that I wound up making five necklaces!

The book, "A Charming Exchange" by Kelly Snelling & Ruth Rae (North Light Books) is a delightful book full of charms created for exchanges. After the exchanges, the charms were used to create amazing bracelets and interesting necklaces.

I have long wanted to make Ruth Rae's "pearl bird nest" charm. It is an elegant design, lovely to wear and simple to make. My first one was finished so quickly that I decided to make a second, using different color pearls. I strung one on leather cord, the other on silk ribbon. I see myself making many more of these for gifts!

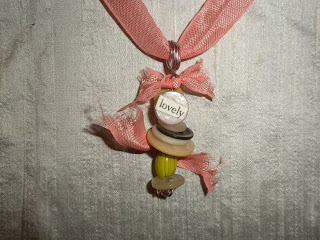
I also loved the button stacks and made my own version of the design. I had so much fun that I made three of them, all strung on vintage seam binding. It was fun to dig through my button stash to find the right color & texture buttons to use. I combined the buttons with a few beads, used gel medium to attach a word and tied snippets of seam binding for added texture. They are adorable!

My photography skills still need work - I took photos with the old camera but they are all blurry. I have yet to load the software for the new camera so I can't post photos from that one yet. Here's hoping I get that done on Saturday so I can show you what I've made.

I love this book and I'm SO happy that I've finally made the pearl filled bird nest charms that I've been wanting to make for so long. Here's hoping I can post photos tomorrow.

Holy Mackeral, where did the week go?

Yikes. It's FRIDAY and I still haven't even picked out the book I'm using this week! It has been a busy week at my office, we had a tax deadline on the 15th which wore me out - I've been going home and lying down for a little "rest" then waking up hours later. Too late to head to the studio!

So, tonight I'll pick out my book & get my act together for my project. I've got some other things I want to work on over the weekend, plus, our garage renovations are finished and it's time to move our "stuff" out of the POD and back into the garage. Here's hoping that we can get rid of a bunch of useless stuff in the process!

Saturday is my birthday, I'm 51. I still think I'm about 25 (which is probably why I take on too much and wear myself out, lol). We're going to dinner with friends on Saturday night - I've already gotten a bunch of cards, a beautiful bouquet of white flowers from my sister, Leslie, and a delicious Edible Arrangement from my step-daughter, Dawn & granddaughter Emily. I'm all set for a tasty, smell-good birthday!

I better get back to work... I'd like to sneak out early but I have a late appointment - who's idea was that on a Friday??? Happy weekend, all.

Thursday, September 10, 2009

New camera!

I forgot to tell you, I bought a new camera tonight! I've been wanting a pocket sized digital camera for a while - I want to carry it so I can build a library of my own photos, taken during my daily running around. I got a Nikon CoolPix S630, 12 megapixels and a 7x zoom. I'm VERY excited about it! I may be posting some photos in addition to the "Bookworm 52" projects.

OK, now I'll go pack for Atlantic City!

"The Promise" quilt

This week's project is finished, here's a scan. It is a 4" square quilt, made on a base of Timtex, a firm batting type material. The blocks were exchanged tonight at a fun meeting - there were twenty-nine participants and everyone did a great job! I wish I could show you all of them but they are going to be submitted for a possible magazine article and I can't let the cat out of the bag! It is a great collection of small art quilts.
The sky is a commercial batik fabric, selected for it's blue shade and lavender "clouds". The background of the center section is also a commercial batik fabric - I hand carved a stamp of trees for the image in the center and I love how it turned out! Little green beads are the buds on the branches (I started out doing french knots but after seven little quilts my fingers were very sore and I switched to beads).
The dark green grass is hand-dyed cheesecloth (dyed by Ellen Anne Eddy, the amazing quilter). I use her cheesecloth in a lot of my quilt and collage projects - it adds great texture and she dyes in a wide range of colors. Yummy stuff.
The bottom section "lawn" is hand-dyed green fabric with large dots I painted with Lumiere paint. Well, I should say "stamped". I used the little round erasers used for white-erase boards. They are sold at Staples and come in three sizes. A fun little tool! I outlined them in black Sharpie marker.
I made thirty-nine of these but only needed 29 (I really must start writing things down!). I have an idea for the ones that are left and will working on that in between other things. I'll post a photo when I'm done.
I was off to a slow start on this project, I have a little pile of sketches on my desk - ideas that started out "brilliant" but that were discarded because they weren't "it". I love what I wound up doing and received many compliments at the exchange.
That's it from me this week, I'm going to pack a suitcase and head to Atlantic City to play in a Women's poker tournament at the Borgata... top prize should be somewhere around $20,000 - wish me luck! I'll let you know how I did when I get back :)

Tuesday, September 8, 2009

A four season girl...

I am definitely a four season girl. I was born in southern New York and haven't ever lived more than fifty miles from the hospital I was born in. One of the things I love about the Northeast is the change of seasons. As much as I can live without the extremes of winter days so cold the air in your lungs seems to freeze and summer days that make me melt when I step outside, I must endure those times to enjoy my favorite seasons, spring and fall. Between the two, spring is my absolute favorite.

After a long, gray winter, I love watching the miniscule touches of green that slowly appear on barren tree branches. I look every day for the tips daffodil leaves peeking through the soil and love the crisp fresh smell of it all. The scents of spring remind me of my flower shop days, spent with my Mom, surrounded by countless buckets of flowers, aromas marrying to create a perfume I will never forget. I love watching the earth come alive and celebrate the gifts of the garden, their sight and smells.

As I worked on my little art quilts, I thought of my love of springtime. I still can't show you my little quilts (the exchange is on Thursday - you'll have to wait like everyone else!) but, I can share the poem I wrote about them. I will be printing the poem on fabric and attaching it to the back of each little quilt. Here it is:

"The Promise"

Charcoal branches own the winter sky
until Mother Nature awakens
and the branches yield
to her power.

A mist of green emerges
to become a leafy cloud.
Spring's promise,
delivered.

Monday, September 7, 2009

Is this cheating?

A couple of weeks ago I said I was going to make 39 little quilts for a quilt exchange in an Art Quilt group I belong to. I really tried to come up with an idea but, given that this is a REALLY talented group of quilters, nothing seemed "good enough" and I never got anything started. I have a lot of sketches though!

After many false starts, I finally got my act together on Sunday and am just about done with all 39 little quilts (4 inches square).

The leader of the group is my amazingly talented friend, Jane Davila. Jane and another amazingly talented friend, Elin Waterston, joined together to write two books, Art Quilt Workbook and Art Quilts at Play (they also have an instructional DVD, Art Quilting Basics). Both books & the DVD are wonderful tools for both new and experienced art quilters (more on the books later in the week).

When I was struggling with my little quilts, I decided to pick up Art Quilts at Play to see if it would give me a kick start. I had already done some painting on fabric and wanted to use that as part of my project. What I didn't have was a "motif" or theme for my project - that's the "other" side of my brain taking over, I always feel like my projects should "say something".

The section on carving your own rubber stamps caught my eye and I decided to dig out the carving tools and soft carving block. I drew a little sketch, darkened it with pencil, flipped it over onto the carving material, burnished it to transfer the pencil marks and carved away. I loved the result!

I don't want to show my project yet since we are due to exchange on Thursday. I'll show it on Friday though! In the end, I'm going to wind up with one of my little quilts and thirty-eight others from the group. I'm very excited to see what everyone else has done!

So, back to the subject line... I had to make this project anyway - is it cheating to use it for the double purpose of "Bookworm 52"??? I decided in the end that it is ok - and, realized that taking that approach might be even more useful to me than making a bunch of random projects. I'm always working on projects to submit to magazines and I haven't been able to get any of those done since I started my blog. Methinks that accomplishing both magazine submissions and blog projects will be a good thing to do when it is appropriate.

More later in the week....

Saturday, September 5, 2009

Six pretty pins...

Is it Saturday already? When I started "Bookworm 52" I didn't realize how fast the days of the work week fly by! Once again, I've spent my Saturday morning in my studio, finishing what I started early in the week. It is good to have a deadline that I am committed to.

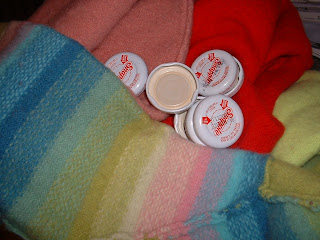
My materials for the week were Snapple caps and shrunken wool sweaters It is getting harder to find 100% wool sweaters at Goodwill - I snatch them up when I see them! I've created a little stash of felted wool sweaters (done by washing the sweaters inside out in hot water with a little bit of soap - I wash them twice and dry them thoroughly in the dryer for maximum shrinkage).

The two flower pins in the top photo were simply made by cutting the felted sweaters in to random flower shapes, layering several layers and stitching them together with a button center. The leaves are from a dark green felted sweater. I added a pin back and they were done! Cute for a blazer lapel or even embellishment on a gift, in place of a bow.

The round pin in the top photo is part of a silk-ribbon embroidery piece that I started but was never going to finish. So, I cut part of it into a circle about 3/4" larger than the Snapple cap, sewed a running stitch around the edge and pulled the thread to gather. Some additional stitching tightened it up and then I sewed a small piece of fabric to the back to finish the raw edges before adding the pin back.

Speaking of finishing... when I was in High School, I was enrolled in the Floriculture program at the local Technical Center. It was the beginning of my training for my career as a Floral Designer. My teacher was Mr. Meyers. One of the things he taught us, that I try to bring to all the work I do, is to FINISH your work. He was referring to one-sided flower arrangements (where all the flowers face front) and wanting us to put greens in the BACK of the arrangement to hide the "mechanics" (floral foam, tape, wires, etc). I apply that idea to everything I make - my goal is to avoid visible glue, unwanted raw edges (sometimes we want them though!), unlined backings, etc. Taking the few extra minutes to make smaller stitches or be careful in your work makes a huge difference in the finished project. Sometimes I'll see a piece that would be exceptional except for strings of glue or lazy finishing. Finishing does not take a lot of extra effort but it is worth the time it takes!

The pins in this second photo were made by sewing circles of shrunken sweaters around Snapple caps (like the silk embroidery pin above). I then stitched on beads and leaves from my stash, adding a touch of ribbon or a dragonfly for finishing touches. The flower on the red rose pin was made from a square of felted wool, I cut a square, folded & tucked until it looked like a rose. I added a few beads to the center and made the calyx from some dark green felted wool. All are finished on the back with more felted wool and a pin back.


As I was cleaning up my studio today, I accumulated a small bag full of water bottles. I've got an idea for them and I'm going to try it later today. If it works out I'll post a photo. If not then I'll put the bottles in the recycle bin where they were headed anyway!


CraftCycle is a book full of fun projects - if you are into making eco-friendly art you should take a look at it!

Wednesday, September 2, 2009

Sweaters and Snapple Caps...

In the spirit of being "green", inspired by the book of the week "CraftCycle", my project for the week will utilize shrunken wool sweaters and Snapple caps, along with some other materials. They are a "work in progress" and you'll have to check back to see what I'm making!

Finding creative solutions is something that I really love to do. I wouldn't call either of my parents "artists" but I frequently saw both of them work out ways to accomplish things in unusual ways. I remember one time, on a family camping trip, the games were in the car and it was raining buckets. Instead of sending my father to the car in the rain, my mother made a checkerboard out of a paper bag and we used coins for checkers. Many years later, I was on a walk in the woods with my granddaughter, Britney. She got tired and we stopped to rest. I looked around and found some twigs and some black stones & white stones. We laid the sticks out in a grid and played tic-tac-toe with twigs and stones. I have Mom to thank for thinking that one up!

Several years ago I attended "Doll University", a fabulous Art Doll conference in California. One of the 'events' of the weekend was a Doll Hat Parade where everyone was to make a doll-based hat and wear it to the evening banquet. Well, I was flying from New York and with all the other supplies I was bringing, I didn't have room for a silly hat. Once I got there, however, I got caught up in the spirit of the weekend and was sorry that I didn't have a hat with me. I decided I was going to find a way to make a hat - the biggest challenge was what to use for a base? In my supply stash I had a couple aluminum pie plates I was going to use for paint. I did a little bending & folding and came up with the base. I covered that with doll stuffing and a layer of fabric. With the addition of some trim, a bow, and a large doll pin at the back, I had my hat! I didn't win any prizes but it was fun to be part of the silliness. It's not easy to get a good photo, but here it is (the dolls face is hidden under the hair from this angle). I call it my "Pie Plate Hat".

We are doing some renovations in our garage and I'm carving out part of the space for a workbench that I can use for "found object" art projects. I've been collecting all kinds of crazy things for a while now. I'm looking forward to having good space for working with my "stash".
Until then, I'll be satisfied making my project of the week out of shrunken sweaters & snapple caps. Check back in a couple of days to see what I've made!